
Did my due diligence and seached past threads here for restoring aluminum valve covers. Consensus being that the best way to do the valve covers was soda blasting.
I stripped the decals and grommets off the LH/RH finned valve covers. One of the good reasons to do restorations is to learn and discover information about your car. I learned in the process that the LH black rubber grommet was wrong, it had a "Taiwan" embossed stamp on the top. Ordered the correct grommet from Zip. There was a GM PN stamp on the underside of the RH black rubber grommet so I know that it is OEM. There were identical GM PN stamps on the underside of LH and RH valve covers, which are "P-3932418-RH C-2 CBC" and I believe the 350 Hp aluminum finned valve covers are OEM also, along with the 90 degree breather tube on the rear RH cover for the air cleaner. I orderd a new metal crossed-flag decal for the RH front cover and also ordered the "HX" valve cover engine code decal for the valve covers from Zip Corvette. I checked on water-soluble water-transfer "HX" engine code decals, info I got from my search efforts here on this site, but Zip did not carry those so I used that they did have.
My restoration steps:
1. I stripped all of the old decals, grommets, and RH breather tube off the valve covers
2. Used dawn dishwashing liquid to clean and degrease the valve covers and soft bristle brush to get crevices clean
3. My first attempt was to blast (twice, inside and out) with soda media from Harbour Freight, using a gravity feed gun
4. Washed and clean valve covers with soft brush and dawn dishwashing liquid, then blow dry with compressed air
- I just did not think the valve covers looked clean after soda blasting
5. Following day, I used glass bead media and did the covers again (twice, outside only). Insides were clean enough
- I have a small 6 gallon pot compressor, set at 120 psi, with a H2O separator and disposable filter canister on the hose
6. My results were better in my opinion, covers looks cleaner, I am happy with the results and that is all that matters to me
7. Washed and cleaned valve covers with soft brush and dawn dishwashing liquid, then blow dry with compressed air
8. I wiped the outside of the covers and then fins with acetone and let sit 30-45 minutes, wiped with clean towel
9. I decided to coat the outside of the valve covers with VHT high-temp satin clear to protect the surface, keep them lookinig nice
10. I used 200 mph metal polish and a rag to polish the chrome oil cap, turned out nice.
11. Put the grommets back in, put the oil cap back on, put the breather tube back in, attached the "HX" decal, put the crossed flag decal on the front of the RH cover. I old decal was not OEM
12. Valve cover "M" headmark bolts were blasted with 70 grit aluminum oxide and coated with zinc phosphate parkerize
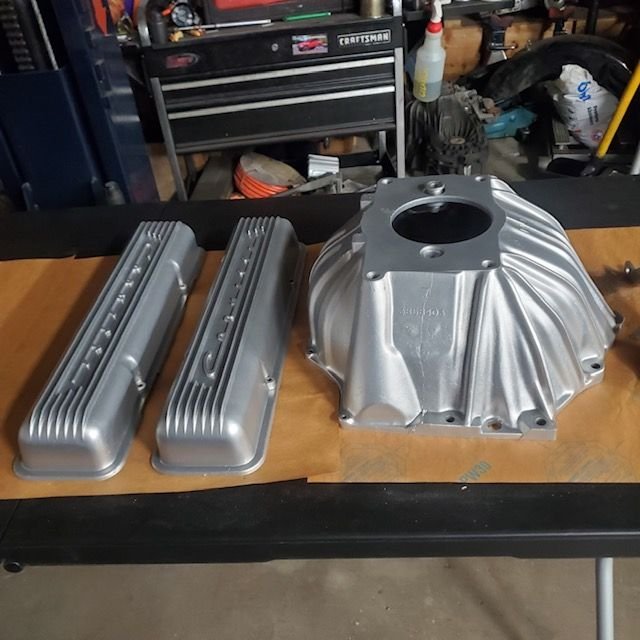
Attached are Before pics, one pic of soda blast result, and After pics of the valve covers. You all have been a tremendous help to me during my restoration journey. I hope this information and details can help others.
Kevin
(KS69Coupe)
I stripped the decals and grommets off the LH/RH finned valve covers. One of the good reasons to do restorations is to learn and discover information about your car. I learned in the process that the LH black rubber grommet was wrong, it had a "Taiwan" embossed stamp on the top. Ordered the correct grommet from Zip. There was a GM PN stamp on the underside of the RH black rubber grommet so I know that it is OEM. There were identical GM PN stamps on the underside of LH and RH valve covers, which are "P-3932418-RH C-2 CBC" and I believe the 350 Hp aluminum finned valve covers are OEM also, along with the 90 degree breather tube on the rear RH cover for the air cleaner. I orderd a new metal crossed-flag decal for the RH front cover and also ordered the "HX" valve cover engine code decal for the valve covers from Zip Corvette. I checked on water-soluble water-transfer "HX" engine code decals, info I got from my search efforts here on this site, but Zip did not carry those so I used that they did have.
My restoration steps:
1. I stripped all of the old decals, grommets, and RH breather tube off the valve covers
2. Used dawn dishwashing liquid to clean and degrease the valve covers and soft bristle brush to get crevices clean
3. My first attempt was to blast (twice, inside and out) with soda media from Harbour Freight, using a gravity feed gun
4. Washed and clean valve covers with soft brush and dawn dishwashing liquid, then blow dry with compressed air
- I just did not think the valve covers looked clean after soda blasting
5. Following day, I used glass bead media and did the covers again (twice, outside only). Insides were clean enough
- I have a small 6 gallon pot compressor, set at 120 psi, with a H2O separator and disposable filter canister on the hose
6. My results were better in my opinion, covers looks cleaner, I am happy with the results and that is all that matters to me
7. Washed and cleaned valve covers with soft brush and dawn dishwashing liquid, then blow dry with compressed air
8. I wiped the outside of the covers and then fins with acetone and let sit 30-45 minutes, wiped with clean towel
9. I decided to coat the outside of the valve covers with VHT high-temp satin clear to protect the surface, keep them lookinig nice
10. I used 200 mph metal polish and a rag to polish the chrome oil cap, turned out nice.
11. Put the grommets back in, put the oil cap back on, put the breather tube back in, attached the "HX" decal, put the crossed flag decal on the front of the RH cover. I old decal was not OEM
12. Valve cover "M" headmark bolts were blasted with 70 grit aluminum oxide and coated with zinc phosphate parkerize
Attached are Before pics, one pic of soda blast result, and After pics of the valve covers. You all have been a tremendous help to me during my restoration journey. I hope this information and details can help others.
Kevin
(KS69Coupe)


Comment