Front and Rear End rebuild - Help, Tom Parsons! You're my only hope! - NCRS Discussion Boards

Front and Rear End rebuild - Help, Tom Parsons! You're my only hope!

Collapse
X
 
  • Time
  • Show
Clear All
new posts
  • Ian G.
    Extremely Frequent Poster
    • September 3, 2007
    • 1114

    Front and Rear End rebuild - Help, Tom Parsons! You're my only hope!

    So here I am trying to rebuild the front suspension and rear end axle of my 59. I read Tom Parson's excellent walk through of rebuilding the front suspension as well as the nice write up he did on the rear axle bearings on the Corvette Forum. I've got everything torn down and repainted and ready to rebuild, and go to town. Bright eyed and bushy tailed. Except, Everything went SNAFU or FUBAR or maybe sideways, you're choice. I'll start with the front end.

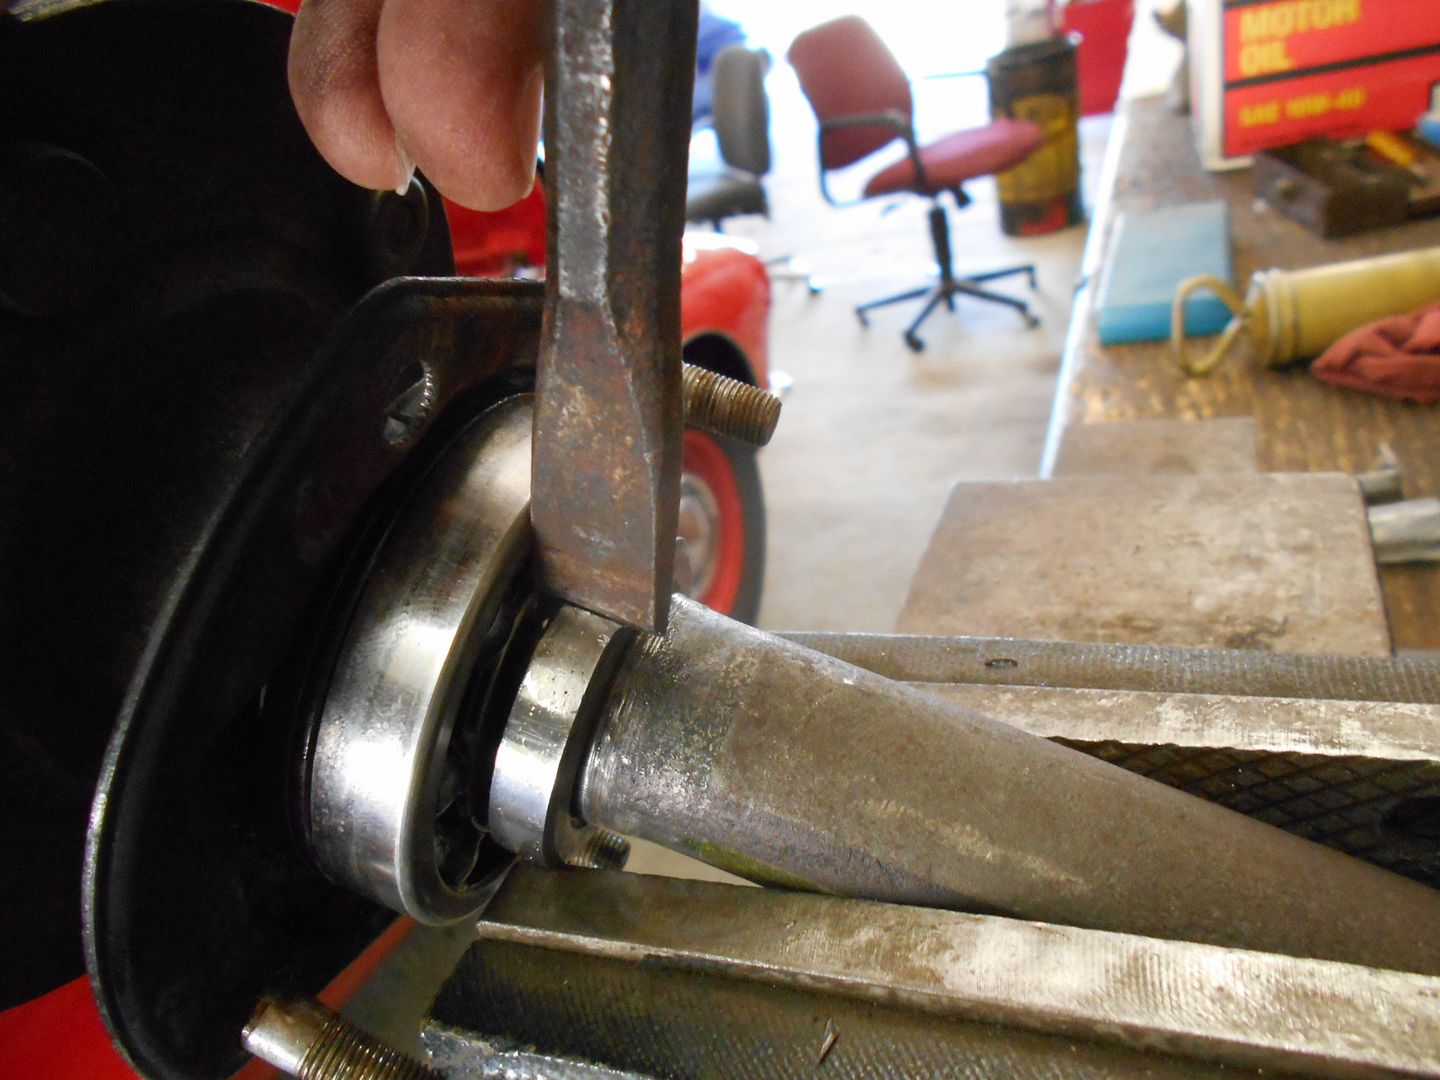
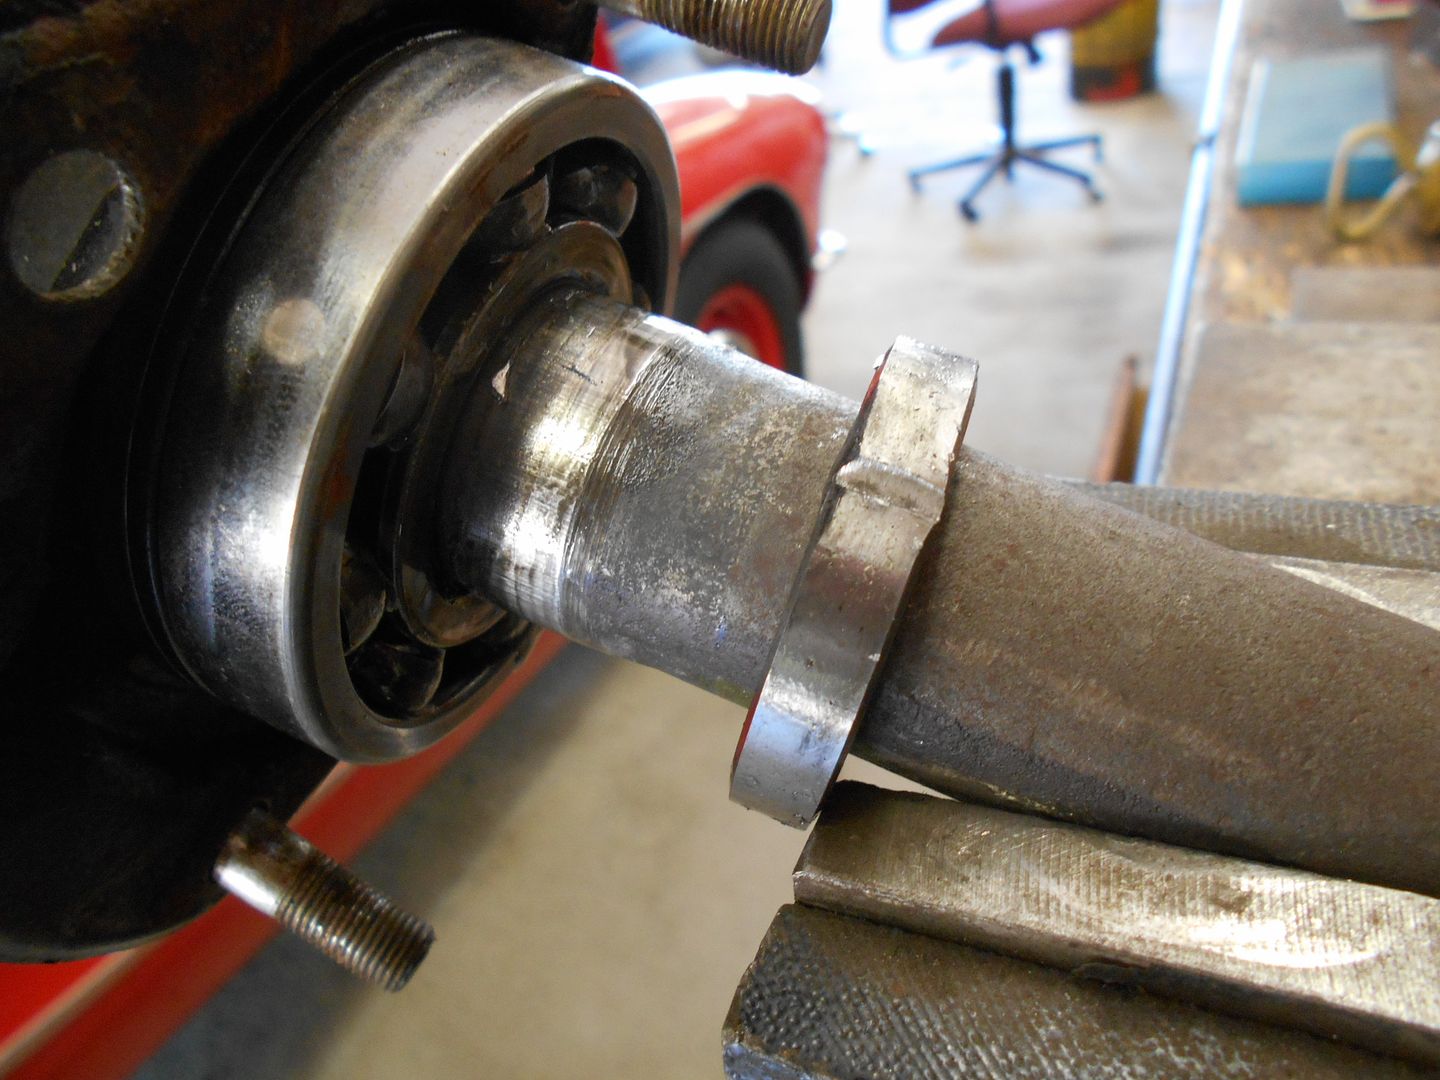
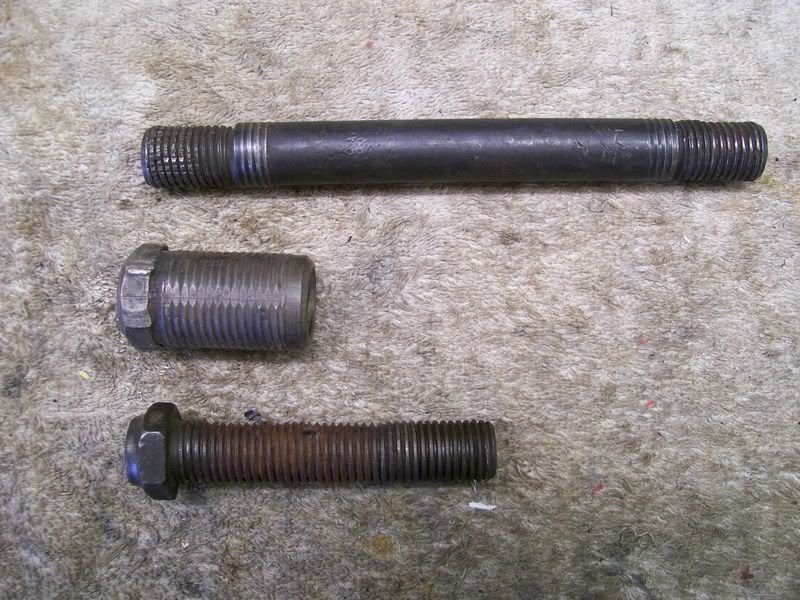
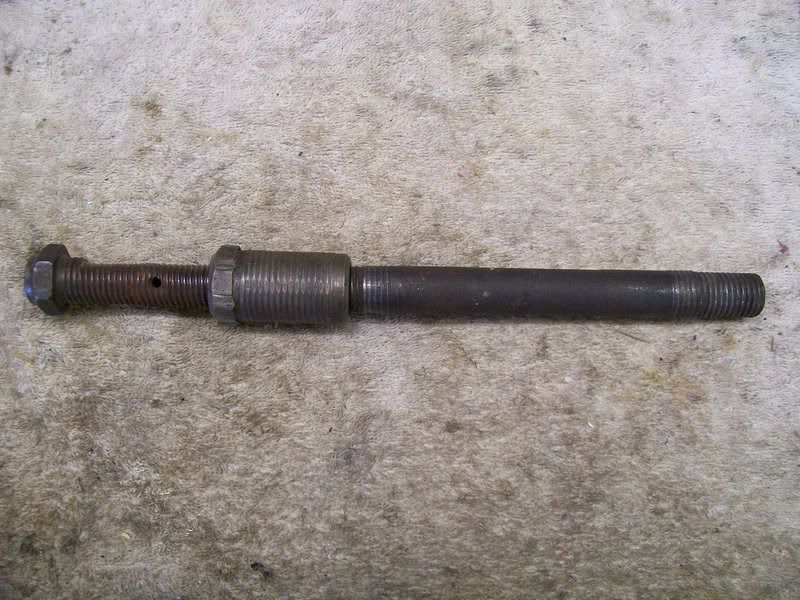
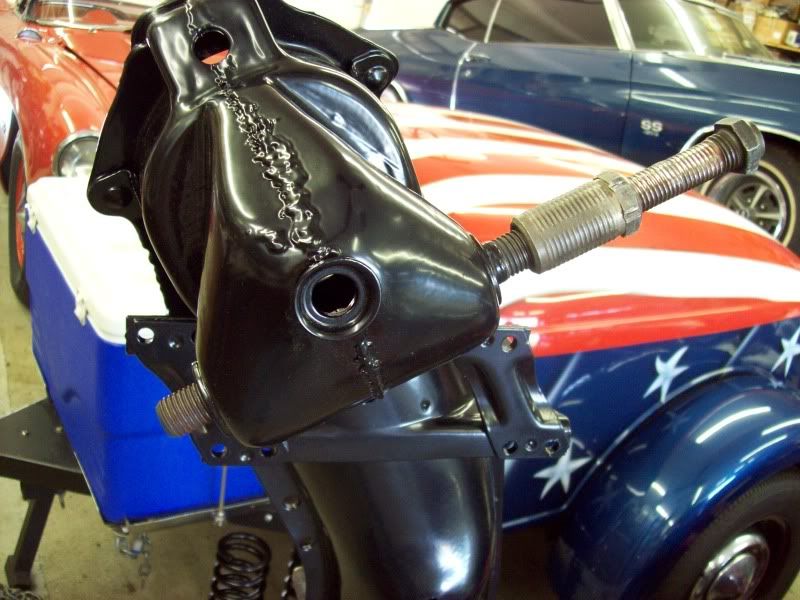
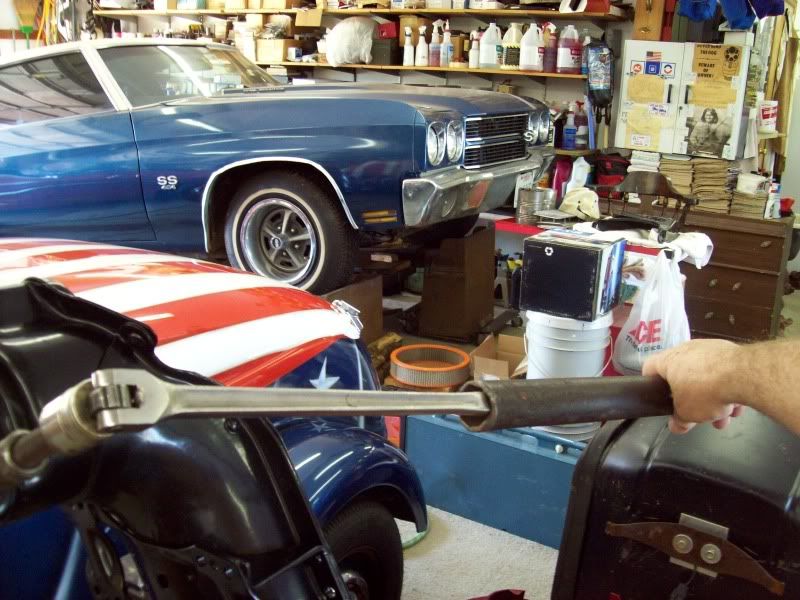
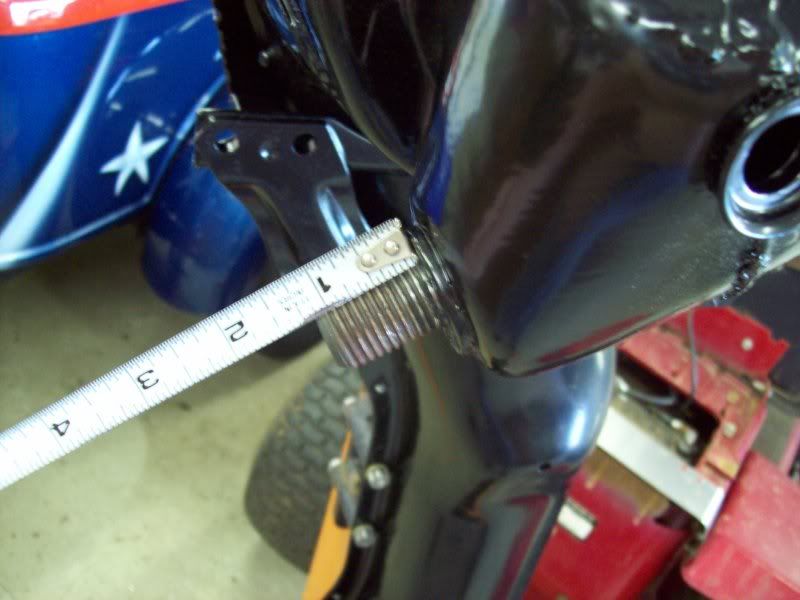
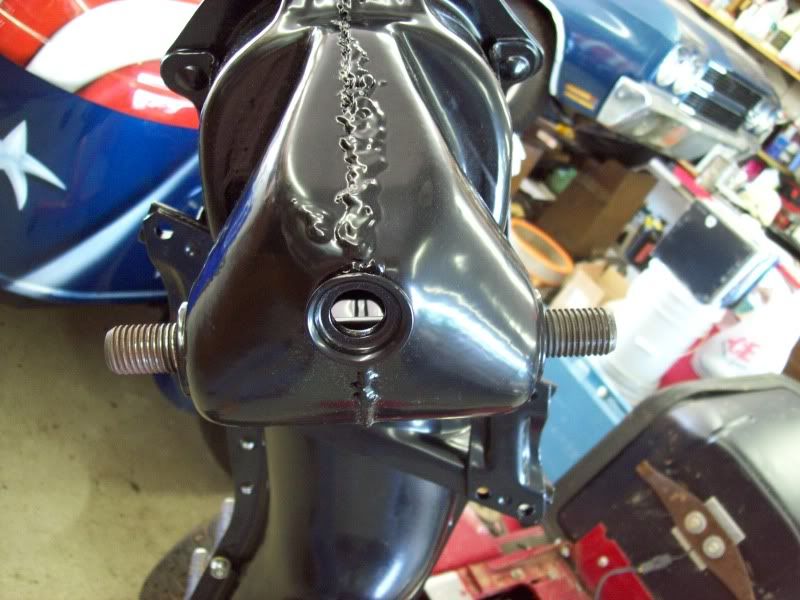
    I removed the upper inner shafts (you probably know where this is going), no problem. I threw out the stud of my lower outer shaft a while back thinking I just needed the bushing (but you need both to install the upper inner shaft), so I got a NORS MOOG set off eBay. I wanted to avoid using my NOS set in case anything went wrong, which it did. With the small end of the upper inner shaft inserted in the front of the front crossmember, it turned nicely by hand and engaged both sets of crossmember threads like it's supposed to. I double checked I had the small and large end of the shaft inserted as it's supposed to be. Then I attached the lower outer bushing as shown with the upper inner shaft screwed into the bushing about half way. I screwed it in as much as I could with my breaker bar, then laid into it with a 3 foot cheater. After a few turns the lower outer bushing proceeded to snap in two!!! I then tried an old upper inner bushing, but it began to split from the bottom. sigh. I have about 3/16" left to screw in the upper inner such that it is equal length on each end. then the other side...

    So now I have a busted NORS upper inner installation tool. Maybe I could weld it back together and try again. I also have jerry rigged lower outer bushing and nut that I could torque down as well, but I'm afraid it will mess up the threads or torque down so hard I cannot remove it without loosening the upper inner shaft if I were to succeed. Or maybe I will get lucky and find J-2958 install tool on eBay (ha ha). I'm hoping for some sage advise on the next course of action. That may be to take it to a shop and have a professional do it, but I'd hate to admit defeat.

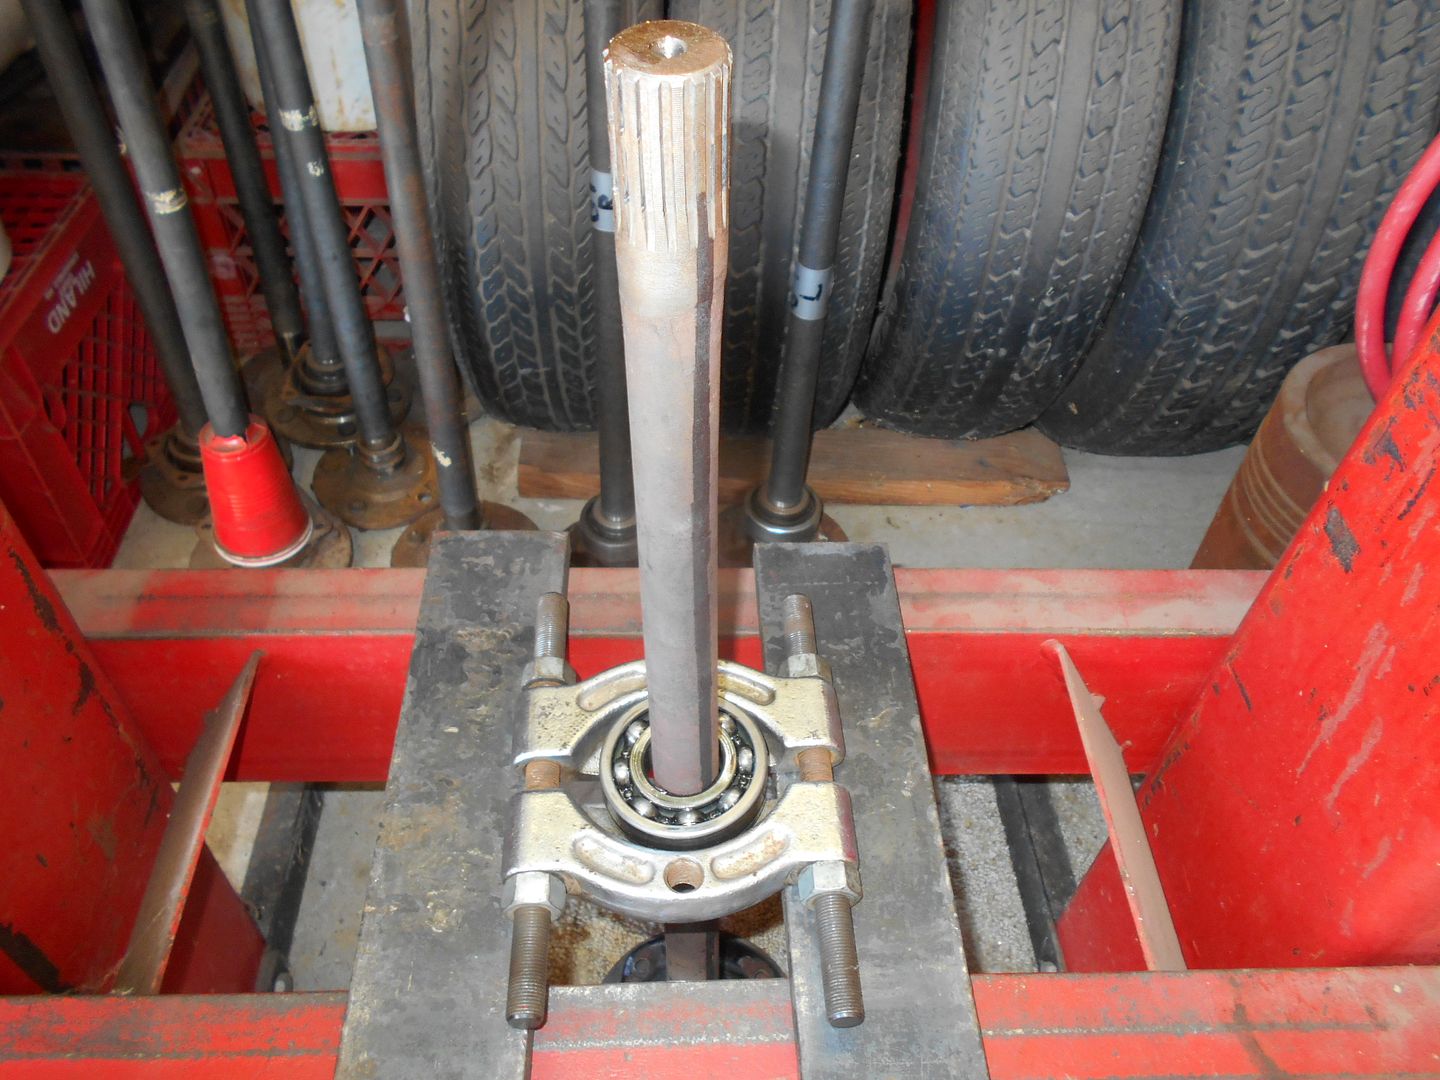
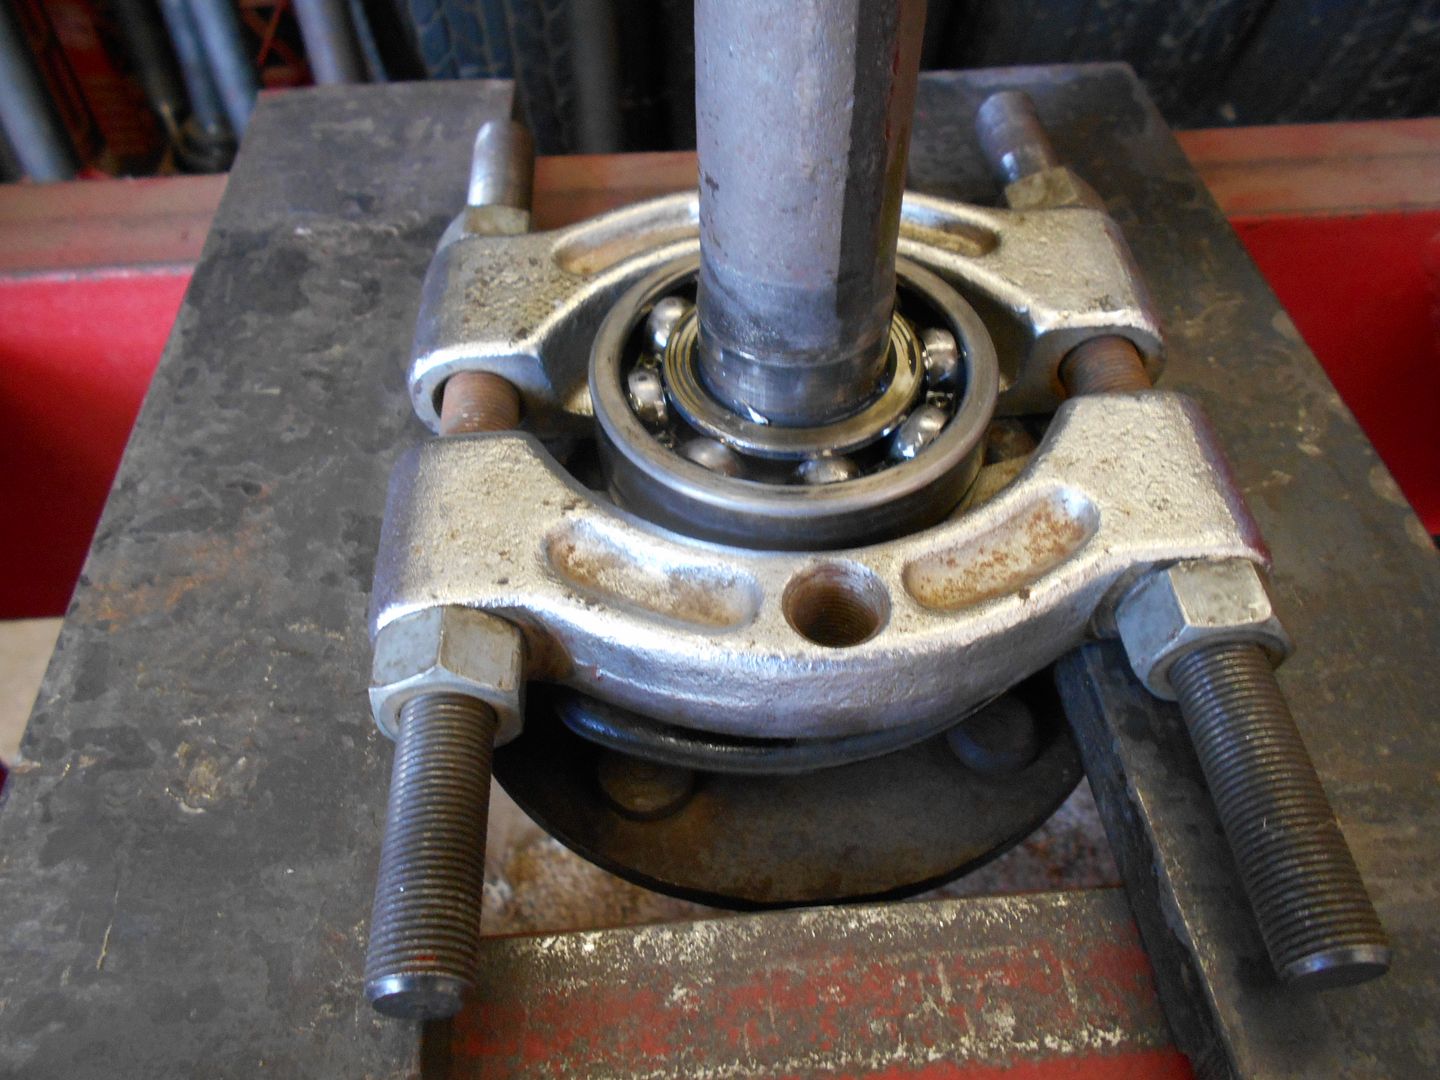
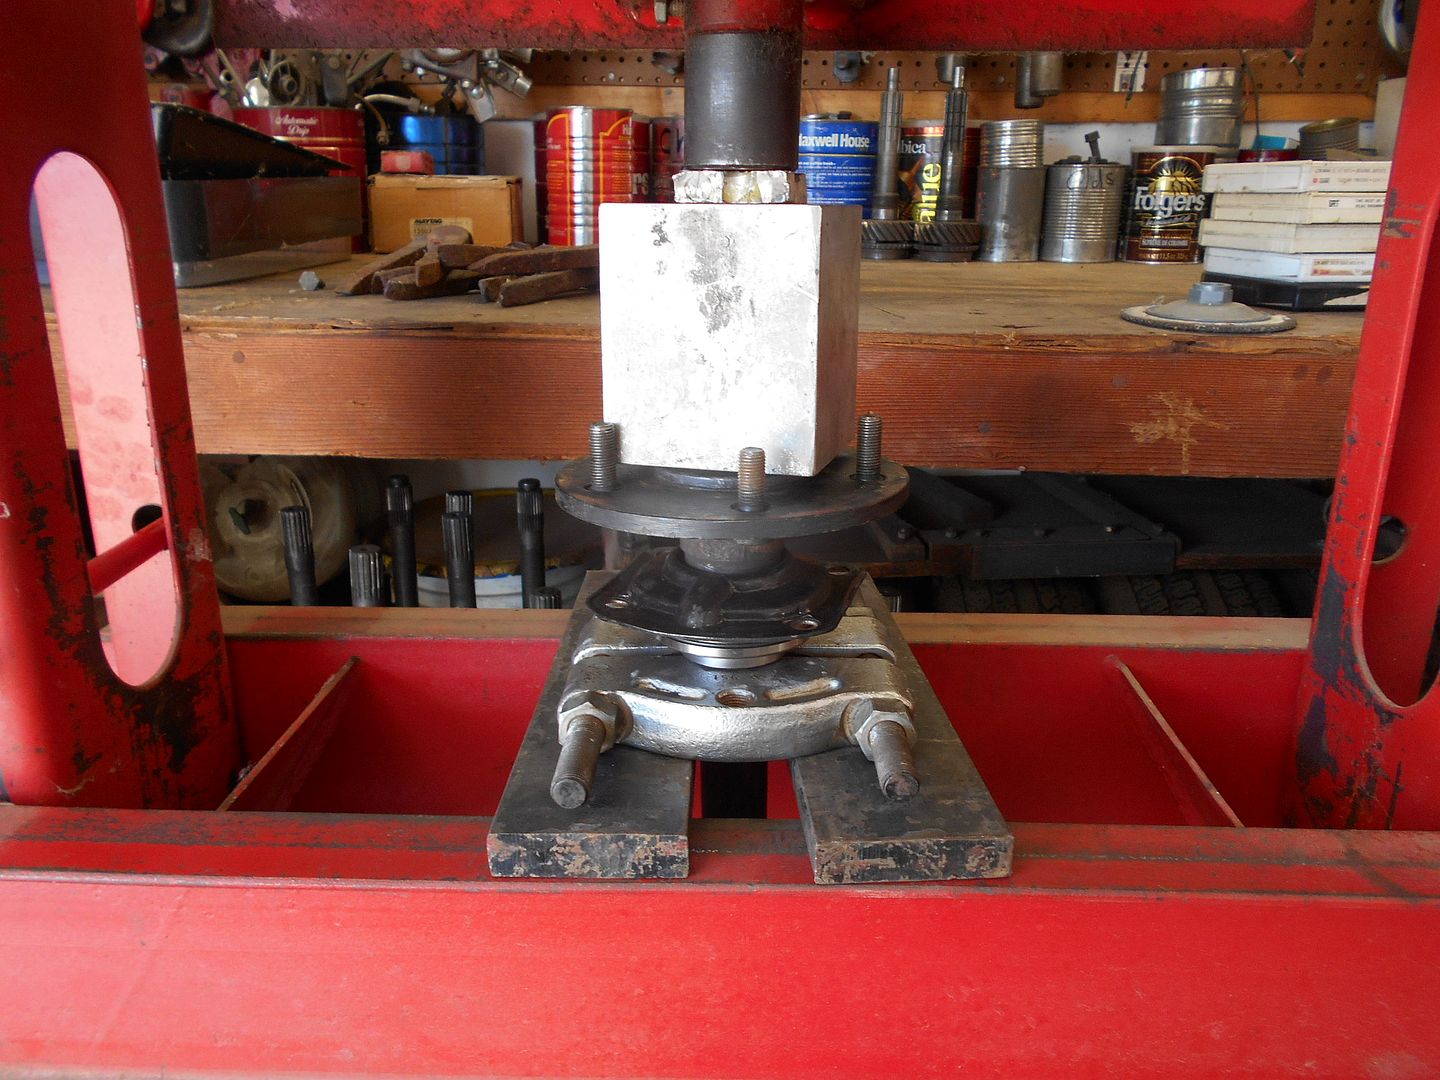
    On to the rear axle. My original Hyatt 1542 roller bearings wiggle by hand, so I have endeavored to replace them. I found a nice set of original 1542 WAB-23 roller bearings on eBay. I read the 58 passenger car manual, the ST-12 and the 49-53 passenger car manual. I have a 20 ton press and a 4 3/4" bearing puller plate. I tapped out the flange bolts, mounted the plate behind the bearing and put the press bottom base on the lowest rung, but the axle was too tall, since it has to go in between the bottom brace. The hardened steel rod to support the brace was too short for me to put pressed wood on the bottom wide enough for the axle to pass trough. So I went out and got 24" long 3/4" black pipe and put some pressed wood on the bottom (you see where this is going). I jerry rigged the setup such that the bearing puller bolt ends rested on a stack of pressboard and steel plate, thought it looked pretty good, donned my safety glasses and athletic cup and proceeded to crank the press down. Well the pipe bent, and even better the bearing puller bolts bent. The tool GM uses was a big steel plate with a hole in the middle, but I can't find one of those at my local Harbor Freight. Before I go and order 3/4" rod and retry I'm hoping someone can let me know if I'm doing this all wrong. if the answer is take it to a professional that's fine too, but again I hate to admit defeat. Is it possible to remove the bearing and the smaller retainer behind it at one time? I read another walkthrough that suggested I need to chisel the smaller retainer off the axle, but I'd like to avoid that if I can, since it will be destroyed.

    If you are still here, thanks for reading this long, rambling post.


    Attached Files
    Last edited by Ian G.; June 5, 2016, 10:55 PM.
  • Eric E.
    Very Frequent User
    • October 31, 1998
    • 254

    #2
    Re: Front and Rear End rebuild - Help, Tom Parsons! You're my only hope!

    Hi Ian,

    Wow, I am glad I followed Tom's instructions and replaced my shafts before I read your post. Looks like you had enough problems for both of us.

    When I installed mine I had to use a 18" bar to get them in place but not near the force that you used. The interference if I remember correctly is .008" with the new shafts. I wonder if yours is more than that.

    I have found that Tom is prompt at responding to emails. PM me if you need it.

    Good luck!
    Eric

    Comment

    • Tom P.
      Extremely Frequent Poster
      • March 31, 1980
      • 1814

      #3
      Re: Front and Rear End rebuild - Help, Tom Parsons! You're my only hope!

      For 56-62 axle bearing replacement---------THE SERVICE MANUAL INSTRUCTIONS SHOULD BE FOLLOWED!!!!!!!!!!!!!!!!!!! DUH!!!!!!!!!!!!!!!!!!
      First, place the axle securely in a vice---------------TIGHT, with the lock ring against the jaws of the vice, as below!
      Use a chisel and a serious hammer to partially split the lock ring. The lock ring does not need to be split completely in two.


      Once partially split, the lock ring will be loose enough that it will slide right off.


      Then install the split bearing removal plate under the bearing and press it off. My Harbor Freight 20ton press has done this MANY times just fine.


      When installing the new bearing (by pressing it on), PRESS THE BEARING AND LOCK RING ON SEPARATELY!!!! AS INSTRUCTED BY THE SERVICE MANUAL!!!!!!!!!!!!! DUH!
      WhenI press the lock ring on, I only press it part way, loosen the pressure, rotate the axle shaft about 90deg, press some more, rotate the axle about another 90deg and continue until the lock ring is all the way on---------TIGHT. This assures the lock ring has been pressed on straight. My uncle (Mom's older brother) was a factory trained Chevy mechanic and he taught me to do it this wayabout 50yrs ago when I had to replace my first set of 57 Chevy axle bearings.


      Oh ya, the reason the bolts bent in your split bearing plate (and probably ruined them) is because you tried to remove BOTH the bearing and lock ring together. Sometimes, short cuts turn out to be rather costly. SPLIT THE LOCK RING FIRST!!!!!!!!!!!!!!!!!

      Comment

      • Ian G.
        Extremely Frequent Poster
        • September 3, 2007
        • 1114

        #4
        Re: Front and Rear End rebuild - Help, Tom Parsons! You're my only hope!

        Thanks Tom. I wasn't trying to cut corners so much as trying to keep from ruining the lock ring, since I thought I had to split it in two. But it seems that isn't necessary. I also put the bearing puller the wrong way with bolts braced over the opening, so they bent. Also, my press isn't as big as yours it looks like... I'll retry after bending the puller back into shape and freeing the lock ring. If the Lock Ring will slide off by hand, how is it tight enough to reuse after chiseling in the groove?

        Any ideas on the front upper inner shaft?

        Comment

        • Tom P.
          Extremely Frequent Poster
          • March 31, 1980
          • 1814

          #5
          Re: Front and Rear End rebuild - Help, Tom Parsons! You're my only hope!

          The lock ring CANNOT, repeat, CANNOT be saved. I'm NOT a metallurgist, so I cannot quote the specifics on how the grain of the lock ring is designed to work. But the bottom line is, the lock ring is designed to go on only one way, ONE TIME. It must be destroyed to be removed. At one time, lock rings were available separately, but no longer. To get a new lock ring today, it is necessary to buy a new bearing (they all come with a lock ring). MANY, MANY years ago when I was trying to locate an extra lock ring for a bearing that was still good (the axle broke), it was very difficult to round up a lock ring. At that time, my local NAPA store said that a warehouse somewhere on the planet showed to have 8. That was all that was in the entire NAPA system. I had him order all of them. I'm now down to 3-4 spare lock rings. And nope, I'm not turning loose of those few.

          Comment

          • Ian G.
            Extremely Frequent Poster
            • September 3, 2007
            • 1114

            #6
            Re: Front and Rear End rebuild - Help, Tom Parsons! You're my only hope!

            I've got the bearings getting shipped to me now, and I can see in the picture they have the lock rings still, so I won't need to beg for yours

            So have you ever had the bushing snap in two while screwing in the upper inner shaft? I'm sure I had it inserted right, because it was most of the way through the other side before I even had to start screwing it in. I checked my other one and I can't even put it in the wrong way.

            Comment

            • Tom P.
              Extremely Frequent Poster
              • March 31, 1980
              • 1814

              #7
              Re: Front and Rear End rebuild - Help, Tom Parsons! You're my only hope!

              I have NEVER had that happen!!!!! WOW!
              I presume you mean that you are using the old LOWER-OUTER shaft and bushing (in the manner pictured below) as an installation tool, right?
              If so, in a pinch, you can use a new one as in installation tool (In a pinch, I have used a new one, but restricted it to ONLY USING IT ONE TIME).


              When finished installing the upper-inner shaft, it is important the the threads on each end are protruding equal amounts.


              Comment

              • Ian G.
                Extremely Frequent Poster
                • September 3, 2007
                • 1114

                #8
                Re: Front and Rear End rebuild - Help, Tom Parsons! You're my only hope!

                Yep thats what I did. I started from your excellent walkthrough as a matter of fact! I want to avoid using my NOS bushings given what just happened. See below (second picture in my posting): I have cut down two old lower outer bushings trying to make the tool Joe Calcagno suggested on rarecorvettes.com, but it didn't work very well either. (maybe because you're supped to weld it together which I didn't read in his instructions.) I have one bushing cut down 1/3 and the other cut so that it is a nut. I'm thinking I can just screw it down on the end and lock in place. I'm worried it will ruin my threads though. I could also just use the 2/3 bushing and put the lower outer shaft (used as tool) through it, maybe cutting the shaft down so that there is not so much sticking out, reducing the stress on the bushing. Or weld the one that broke back together, and cut down the shaft tool so it isn't so long. Thoughts?

                Attached Files

                Comment

                • Tom P.
                  Extremely Frequent Poster
                  • March 31, 1980
                  • 1814

                  #9
                  Re: Front and Rear End rebuild - Help, Tom Parsons! You're my only hope!

                  You need to have the LOWER-OUTER shaft screwed into the LOWER-OUTER bushing, and then lock them onto the new upper-inner shaft. By doing it this way, MOST of the pressure on the new upper shaft is being applied to the END of the shaft rather than to the threads!
                  If you wanted, you could cut down the length of the lower-outer shaft and bushing, but I don't.

                  Comment

                  • Ian G.
                    Extremely Frequent Poster
                    • September 3, 2007
                    • 1114

                    #10
                    Re: Front and Rear End rebuild - Help, Tom Parsons! You're my only hope!

                    Looks like I will need to weld it back together and cut down the shaft and try try again! Thanks Tom. Can you tell me what size that steel bar is you use on your press? I need to go to a metal supply to get some as that's my other problem with the axle bearing removal. The adjustable beam for my press is too small for the axle to pass through. I need to get two metal bars, some 3/4 rod to go through the feet long enough to hold up the bar, and then some more bar to go across. The bar looks 6" wide, but I can't tell how thick...

                    Comment

                    • Tom P.
                      Extremely Frequent Poster
                      • March 31, 1980
                      • 1814

                      #11
                      Re: Front and Rear End rebuild - Help, Tom Parsons! You're my only hope!

                      The steel bars and the big chunk of aluminum were paid for your tax dollar when I worked at Tinker AFB. I retrieved them from the scrap metal bins in the shops.

                      Comment

                      • Ian G.
                        Extremely Frequent Poster
                        • September 3, 2007
                        • 1114

                        #12
                        Re: Front and Rear End rebuild - Help, Tom Parsons! You're my only hope!

                        Thanks SOOOO much for your help Tom! After picking up a pair of 3 foot long, 1 inch thick pieces of steel for the bottom of the press, I was able to get the bearings off. Though I ended up having to use a Dremel tool on the lock rings most of the way, as they were pretty hard steel and doing a number on my Dasco chisels. I also got my NOS Hyatt 1542 WAB-23's today and thankfully they DO have the lock rings in the box. So I should be good to go once I get everything cleaned up.

                        Next I need to try again to get the upper inner shafts into the front crossmember after I have a buddy weld the lower outer bushings back together. Hopefully it holds this time. Thanks again for helping out this noob. Thanks to Eric too!

                        Attached Files

                        Comment

                        • Eric E.
                          Very Frequent User
                          • October 31, 1998
                          • 254

                          #13
                          Re: Front and Rear End rebuild - Help, Tom Parsons! You're my only hope!

                          Ian, glad I could be of some help and to see that you are making progress from on the other day.

                          Take care when finishing the upper shaft replacement. Once you start turning it again be very careful that you don't take it too far. Also, watch your bearings that they don't loosen up at the welds from too tight of a fit or you will be replacing those too.

                          Looks like we are both at the same point in the chassis as I am with my 62. Keep in touch and we can compare notes. You just reminded me to start sourcing front and rear bearings as I am just getting ready to start on the rear suspension. Eric

                          Comment

                          • Ian G.
                            Extremely Frequent Poster
                            • September 3, 2007
                            • 1114

                            #14
                            Re: Front and Rear End rebuild - Help, Tom Parsons! You're my only hope!

                            I ended up ruining the one upper inner stud and had a shop do it for me after I bougt a new one. They called me and told me they couldn't get it in either, but I sweet talked them and they eventually got it. It's moving along now. I have the upper and lower A-arms in now. Tom, how many lbs should I torque down the bolts for the lower inner shafts? Your walkthrough doesn't seem to mention and neither does the ST-12 that I can tell. The 49-54 passenger guide seems to match the ST-12 more or less and I can't find it there either I guessed at about 20 lbs, but since I'll be driving this thing I'd rather not guess

                            Comment

                            • Tom P.
                              Extremely Frequent Poster
                              • March 31, 1980
                              • 1814

                              #15
                              Re: Front and Rear End rebuild - Help, Tom Parsons! You're my only hope!

                              I don't know of any torque specs. I just tighten them until I "feel" they are torqued sufficiently, thus, I've never put a torque wrench on them.

                              Comment

                              Working...
                              Searching...Please wait.
                              An unexpected error was returned: 'Your submission could not be processed because you have logged in since the previous page was loaded.

                              Please push the back button and reload the previous window.'
                              An unexpected error was returned: 'Your submission could not be processed because the token has expired.

                              Please push the back button and reload the previous window.'
                              An internal error has occurred and the module cannot be displayed.
                              There are no results that meet this criteria.
                              Search Result for "|||"