-
-
Re: 1966 Power Antenna Disassembly
Wayne,
Here is a current thread running on the CF.
https://www.corvetteforum.com/forums...post1607588542Leif
'67 Coupe L79, M21, C60, N14, N40, J50, A31, U69, A01, QB1
Top Flight 2017 Lone Star Regional -
Re: 1966 Power Antenna Disassembly
Wayne,
There are, also, additional threads directly below on this page under "Similar Threads".Leif
'67 Coupe L79, M21, C60, N14, N40, J50, A31, U69, A01, QB1
Top Flight 2017 Lone Star RegionalComment
-
Re: 1966 Power Antenna Disassembly
Wayne, That's me over there. My request for a measurement turned into a info thread. I've been meaning to do a complete rebuild thread, start to finish, but other priorities got in the way.
........
So for now, here is the method to help get it apart. Some of this you've already done but showing for a raw startup for others to follow too.
It is best to remove all of the wax coating.
Antenna_Before_01.jpg
Antenna_Before_24.jpg
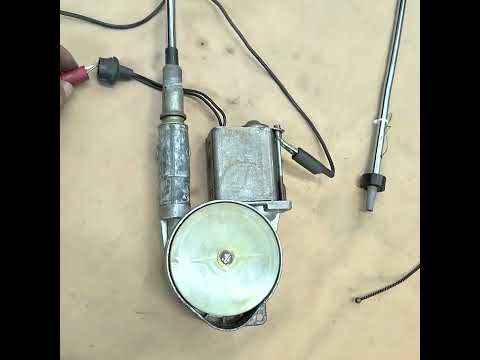
You'll need to remove the motor to slide the cable out later. Unscrew the 2 long bolts, 1/4" hex. Since the motor is working, you could run it to get the cable out, but at this point you don't want to risk breaking the cable. Plus when you reassemble the pieces later, it'll be easier to reinstall the cable.
With slack on the cable, carefully pull the motor away from the housing. The shaft worm gear will try to get jammed up on the plastic gear it drives, so use caution. If it gets stuck, use a few paint sticks to help the motor off the housing by prying between the housing and the armature end.
Next, unscrew the mast coupler(it has the black plastic ring on top that the mast goes through and seen after on the car). It's a pot metal casting with large threads, left side of this photo. It has flats for a wrench. Slide that off from the mast.
Antenna_Before_21.jpg
Then remove the 3 screws holding the tubular steel mast base to the gear housing. There's a orientation notch in it. There will be a green wire soldered to the mast and the radio cable connector. You can de-solder it or leave it together if the mast & cable is ok.
If the cable is broken or if it is seized in the mast, it's not good. You can still get it apart via this method, but getting new parts is the problem.
Pull on the tubular steel mast base until it's free from the gear housing. There's a large black locating ring that will come out of the housing. This is affixed to the mast and cannot be removed(without cutting it).
Group_B_09.jpg
You can now remove the cable from the gear housing, up to a point where the cable end brass ball stops it. You'll have to remove that ball, as it cannot fit through the plastic guide ring. The hole is too small for the ball.
Use a Dremel with a cutting disk and slice a slot in it, then remove it. You'll notice a small crimp in it from original manufacturing. Save it in your parts pile for later reassembly.
Antenna_DS_Fixed_06.jpg
Antenna_DS_Fixed_07.jpg
Now you can pull the cable completely out of the housing.
You can use 2 C-Clamps to compress the gear to remove the C-Clip. I did this on one antenna(my first)before I figured out it's necessary to remove the ball then the cable to get the gears out.
Group_B_04.jpg
Group_B_07.jpg
You can remove the ring guide once the cable is out. The cable passes through the side of it.
20231211_100323.jpg
The 2 gears will have 4 springs and steel balls between them. This acts as a clutch when operating the antenna to prevent the gears from stripping and /or seizing the motor operation.
20231211_100304.jpg
One you have these pieces on the bench you can get everything cleaned up.
20231211_100219.jpg
If your whip(top stainless section) and chromed brass masts and cable are ok, you are fortunate.
Reassembly is a reverse operation after cleaning and lubrication.
The cable spins on the top whip, so you can use a drill clamped to your bench and the other end in a soft vice, and with 2 wire brushes held together over the cable to clean it. Carefully. A helper is recommended to help support the cable as it turns with the drill.
Antenna_DS_Fixed_45.jpg
Antenna_DS_Fixed_46.jpg
It may take some time to clean the metal ring gear. It's a riveted sandwich with lots of debris between the teeth.
Antenna_DS_Fixed_43.jpg
I use Hi temp wheel bearing grease on the cable & gears. Lithium type not recommended.
Install the 4 springs and balls in the plastic gear slots and set it in the cleaned housing. I use a light machine oil on the shaft and gear bushings. not much, just a little.
20231212_152628.jpg
Now slide the main metal gear onto the shaft. Don't worry about orientation alignment. It'll find itself during operation. The sandwich slips like a clutch, randomly during max up and max down cycles. It's a loud clacking sound you can't miss.
20231212_152643.jpg
Using the clamps as before, now install the C-clip to mate the 2 gears back together.
20231212_153057.jpg
Insert the ring guide so that the hole for the cable and metal cable guide is oriented toward the mast opening. It has alignment slots.
Antenna_Group_4_Fixed_16.jpg
After inserting it in the housing, now you can solder the brass ball to the cable end. Put some tape around the end of the cable to keep clean for the solder. Push the cable through and the gear and it will rotate(remember you took the motor off, you can't do this with the motor there unless you run it.
Give the ball a plier squeeze, then solder it to the cable.
Antenna_Group_4_Fixed_21.jpg
I use silver solder and flux with a torch. A heavy duty soldering gun works too.
Antenna_Group_4_Fixed_22.jpg
Place the ball end back in the spool locating slot, then rotate the spool down into the housing. Ensure the cable doesn't tangle. The shorter length of cable here is better. Extend the whip to shorten it up at the spool if needed.
Antenna_Group_4_Fixed_24.jpg
Antenna_Group_4_Fixed_26.jpg
Attach the screw to hold the spool on. I use a dab of blue threadlocker.
Antenna_Group_4_Fixed_27.jpg
Push the mast end back in the housing then reassemble the mast coupler, resolder the wire(if removed), then install the 3 screws to hold it back together.
Antenna_Group_4_Fixed_30.jpg
Test the mast tip/whip/mast sections to the cable connector contact with a ohm meter for continuity. You'll get around 0.5 to 1.0 ohms.
Antenna_Group_4_Fixed_37.jpg
Also test the center cable connector contact to ground to ensure it's not shorted. If it is, the cable may have slipped out of the spool and is hitting the case, or the mast or cable is shorting somewhere.
Antenna_Group_4_Fixed_38.jpg
When all tests pass, you can snap the cover back on. If all good, reinstall the motor to the housing with the 2 long screws and hook it up to a battery (properly fused, 15 or 20 Amp is fine) for a test.
Group_5_058.jpg
Ground attaches to the motor case. Positive to each terminal one at a time for extend and retract. Here I did a test before attaching the ball as a simple check before final assembly.
The special coating is a wax based material that must be heated to a liquid and the motor assembly gts dipped and removed, cooled, etc. More on that as I research further.
I've been successful releasing a seized whip/cable, once. The second time on a different unit has proven just the opposite.
I've also been successful removing, dissecting, and repairing a mast assembly. That will be addressed in a future article.
Rich
P.S. I did this on the fly and may add more info later when I get some cycles.Last edited by Richard M.; March 5, 2024, 07:43 PM.Comment
-
Comment
-
Re: 1966 Power Antenna Disassembly
Wayne, I hope you can free it up.
I've done 2 now. The first I was able to free up. The second one, no.
See post #19 in this thread from last month.
RichComment
-
Re: 1966 Power Antenna Disassembly
Wayne, I noticed something in your first photo. You'll want to address this.
The brass bushing for your spool should not be removable.
Wayne_L_mod.jpg
On the unit I just restored, I noticed after reassembly when I did my final test under power, that the spool was rotating on the bushing intermittently.The bushing was not rotating on the shaft sometimes. I removed the spool. The bushing was loose. It pulled out easily.
20240306_163455.jpg
The bushing was knurled to press fit into the plastic spool originally. After years of use it likely sawed it's was through the plastic.
20240306_163507.jpg 20240306_163512.jpg
I used my Blue threadlocker on the bushing and let it cure overnight, then I reinstalled the cable into the spool and fastened the screw and did my final test again running it through several up/down cycles. All was good. I was done.
Some additional notes about some of the parts.
Ensure the copper washer sits at the bottom of the gearcase shaft. Add a drop of oil.
20240306_152236.jpg 20240306_152241.jpg
Also note the very thin washer on top of the metal cable gear. It sits under the C-Clip.
20240306_103225.jpg 20240306_103235.jpg
On this last one, I decided to coat the metal gear with paint to prevent rust. I masked the bushing areas and the perimeter of the teeth and gave it a light coat of Eastwood silver on both sides. I used my wire wheel to clean it, not media blast as I didn't want to get any loose particles in the gears.
20240306_145053.jpg 20240306_145040.jpg
I also decided to assemble the 2 gears using a bar as a support foot clamped to my vice. Then I used my 2 clamps as explained earlier for C-clip removal, to compress the assembly for C-clip installation.
20240306_094726.jpg 20240306_094705.jpg 20240306_094958.jpg
I was then able to drop the gear sandwich back into the gearcase fully lubricated as one assembly.
20240306_150352.jpg 20240306_150408.jpg
====
RichComment
-
Comment
-
Re: 1966 Power Antenna Disassembly
Wayne, Yes, that is the main issue I've had as well on 2 of 3 I've worked on. The raw steel Helix cable assembly gets rusted inside tubular mast 1. Water seeps down the whip into mast 1 over time and it rusts the cable, then the rust expands and locks it in.
As I explained in that other thread, Post#19, I used 2 wooden blocks to support the whip from bowing when striking the whip tip to free it from mast 1. The drawback was that it dislodged that internal collar in mast 2 which keeps mast 1 at its designed height above mast 2. Then I had to cut the mast assembly at its base to get it apart so I could reinsert that collar. Then cleaned and reassembled all of the masts then mast 3 re-peened back to the base.
I think you may have to do the same.... In order to get the whip down, it will take force. I was successful on that first one, the 2nd one is still not moving. The cable is beyond repair, broken in several places so it's more of an experiment. I too was thinking of some hydraulic aid by using a press, but fixturing it would be tricky, and would still likely do damage. So I just got a bigger hammer instead.")
After taking it apart, with just the whip and mast 1, I've tried several methods. I measured the length of the cable that's stuck in mast 1. Seven inches of the cable is locked inside.
StuckCable_7inches.jpg
I've tried several brute force methods, including my hammer hits on the top of the whip while holding mast 1 in a vice, supported by a flat washer against the mast expanded area, and a stop washer on top of mast 1. No movement.
Photos of that failure here....
20240310_192403.jpg
20240310_192332.jpg
20240310_192339.jpg
20240310_192310.jpg
Then I set it up horizontally and clamped my hammer drill on the whip tip. It didn't budge it.
I also tried my hammer drill on the bottom end of the mast to try to get the cable moved forward/upward/outward, using a 5/32 drift on the opposite end while supporting the top of mast 1 in a predrilled oak block so the force was against the top of mast 1. No movement.
Photos of that failure here....
20240310_095759.jpg
20240310_100100.jpg
20240310_100528.jpg
20240310_100543.jpg
Since then I've not had any success and put it aside until the next idea comes to me. Maybe dynamite.
I hope you can get yours feed up using some "soft" technique.
RichComment
-
Comment
-
Re: 1966 Power Antenna Disassembly
Wayne, Glad you got it. Nice work!
RichComment
-
Re: 1966 Power Antenna Disassembly
I don't him personally but, Rich has helped me out tremendously over the years through this forum. His pictures and explanations are second to none as far as details go. I can't even remember how many of his post I used to get me through my restoration.
I always wondered if I could tackle a rebuild on an extra power antenna I have. So, after reading his #5 thread very carefully I could not help but notice his final comment:
"P.S. I did this on the fly and may add more info later when I get some cycles."
I can't wait to see what he can do if he would just put a little effort into his postings!!!!
Sorry Rich, but that comment just made me laugh, as that post is your idea of "on the fly" and I had to comment on it!
Jim
JimComment
-
Re: 1966 Power Antenna Disassembly
I have a question regarding lubricating these power antennas. Is it possible to lube the mask sections so they don't become frozen over time? If so, what type of lube?
I have a '65 that I just reinstalled a Greg Thompson rebuilt original power antenna assembly which works great.
Thanks,
JamesComment
-
Comment


Comment