C2 Headlight Motor Diagnosis, Test, and Repair Process - NCRS Discussion Boards

C2 Headlight Motor Diagnosis, Test, and Repair Process

Collapse
X
 
  • Time
  • Show
Clear All
new posts
  • Richard M.
    Super Moderator
    • August 31, 1988
    • 11284

    C2 Headlight Motor Diagnosis, Test, and Repair Process

    This failed motor came to me to diagnose. It was previously working, then externally restored, a new reproduction cast gear installed, lubed up.... but after reassembly it would no longer run.

    Here it is when it came to me today.
    Jerry_HL_Motor_002.jpgJerry_HL_Motor_004.jpg


    First I tried turning the thumbscrew but it was very tight.
    Jerry_HL_Motor_009.jpg

    Then I connected it to a battery to see it fail electrically. No movement whatsoever.


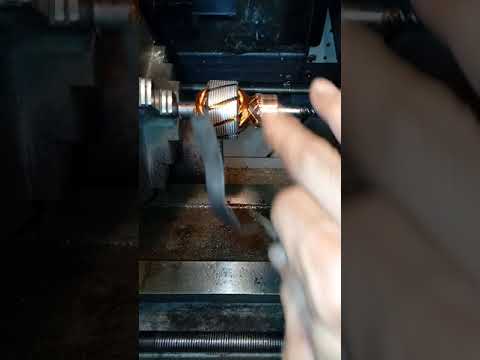
    I removed the gearbox cover and gears to then test the motor separately.
    Jerry_HL_Motor_0012.jpg


    It was still very tight without the gears and cover installed using the thumbscrew, but a tad easier than when it was all together. I then connected a 12V battery source and a ammeter to check the current draw. It was about 9 amps and the motor would hardly turn.

    Bare motor test, no gears


    I then opened up the motor case by removing the gearbox housing for diagnosis. This is done by removing the 2 long hex head screws. There are 2 special clips holding the brush plate to the case. Pry those up and raise the plate up and over the end of the shaft.
    Jerry_HL_Motor_0013.jpgJerry_HL_Motor_0015.jpgJerry_HL_Motor_0016.jpg


    Note one brush lead connects to the motor case. This is the ground path for the motor. It is tack welded to the case so use caution when removing the brush plate. The other brush lead attaches to the thermal breaker. Check the contacts of the breaker and clean slightly if needed. If the motor overloads the breaker will open then close on cool down.
    Jerry_HL_Motor_0019.jpgJerry_HL_Motor_0020.jpg


    The armature and the end frame bushing. Both ends of the armature shaft and both bushings were quite dry. However this unit was in very nice condition and just needed some lubrication.
    Jerry_HL_Motor_0021.jpgJerry_HL_Motor_0022.jpgJerry_HL_Motor_0024.jpg


    I tested the armature using my Growler to check for shorts to ground and open commutator contacts. All tests passed.
    Jerry_HL_Motor_0026.jpg

    Growler video


    I then cleaned the commutator using the lathe with 1000 grit paper. Then using the backside of a X-Acto knife blade I cleaned all open spaces between contacts. Then I polished both shaft ends using the lathe again.
    Jerry_HL_Motor_0029.jpgJerry_HL_Motor_0030.jpgJerry_HL_Motor_0031.jpgJerry_HL_Motor_0033.jpgJerry_HL_Motor_0037.jpgJerry_HL_Motor_0038.jpg

    Lathe work


    I then cleaned the bushings using a rotary wire brush. Then I oiled both shaft ends and the 2 bushings, one in the motor endframe, the other in the gearbox housing. I use a light sewing machine grade oil which flows easily. Note there is a very small felt wick in the endframe. Soak the wick with oil.
    Jerry_HL_Motor_0041.jpgJerry_HL_Motor_0035.jpgJerry_HL_Motor_0034.jpg

    I then reassembled the motor without the gearbox to test it separately.
    The armature is placed into the motor housing and its end shaft through the endframe bushing. With brushes inserted in their holders, the brush plate is reinstalled with the side clips set into the recesses in the motor housing. Then the brush springs are reinstalled. Note their orientation.
    Jerry_HL_Motor_0043.jpgJerry_HL_Motor_0044.jpgJerry_HL_Motor_0045.jpgJerry_HL_Motor_0046.jpgJerry_HL_Motor_0047.jpg


    I tested the motor(without gearbox)and it ran fine. Cleaning and Lubrication fixed it.

    Motor test no gears


    I then reassembled the gears and gearbox cover.

    Note: The orientation of the large cast metal gear and washers is important. First the small diameter steel washer into the housing, then the large diameter beveled spring washer with cone facing up, then the gear, then the plastic washer over the gear.
    EDIT... I am researching this more as there has been years of confusion about this "washer" order/configuration. All GM documentation shows the washers a certain way but I've had many problems with motors over the years when configured that way. More to come.


    Use a good grade of grease on the gears, but not too much. Don't use lithium grease.

    Then the 4 screws for the gearbox cover are then installed and tightened. Then I tested the motor assembly and it ran properly in both directions. I then adjusted the armature shaft end play by loosening the locknut then turning the stud adjuster screw until the motor just started to drag, then back until I could hear the speed increase, then tightened the locknut while holding the screw.

    Note that the end play screw on this motor appears a bit longer than typical. I have seen both lengths. Here are a few photos and measurements. Note on some screws there is a plastic button on the end that contacts the armature shaft. There is a cavity in the end of the screw and the button is pushed into it. Some do not have the button.
    1110201121a_resized.jpg1110201122_resized.jpg1110201123_resized.jpg

    The two problems appeared to be insufficient lubrication and dry bushings in the motor portion and incorrect order of one of the washers in the gearbox portion. All fixed. Motor draw around 4.8 amps now.

    Final Test


    Jerry_HL_Motor_001.jpg

    ====
    Rich
    Last edited by Richard M.; November 10, 2020, 06:23 PM.
  • Gary B.
    Extremely Frequent Poster
    • January 31, 1997
    • 6964

    #2
    Re: C2 Headlight Motor Diagnosis, Test, and Repair Process

    Rich,

    Is a 4.8 amp draw typical for these motors? Based on nothing in particular, I would have guessed lower.

    Gary

    Comment

    • Richard M.
      Super Moderator
      • August 31, 1988
      • 11284

      #3
      Re: C2 Headlight Motor Diagnosis, Test, and Repair Process

      Gary, I'm unsure as I've not tested current draw on many and if I did, I forget what the readings were.

      However around 5 amps seems reasonable to me. When it wasn't working it was nearly double that, which isn't good for interconnects like bulkhead conns etc.

      edit..... Also, when a load is put on, i.e. turning the buckets when installed, the current will be higher. Recall a 40 AMP circuit breaker is used for the pair of motors.

      Rich

      Comment

      • Gerald C.
        Extremely Frequent Poster
        • June 30, 1987
        • 1273

        #4
        Re: C2 Headlight Motor Diagnosis, Test, and Repair Process

        Rich,

        Thanks for your help! Also, nice instructional video....

        Jerry

        Comment

        • John F.
          Extremely Frequent Poster
          • March 23, 2008
          • 2395

          #5
          Re: C2 Headlight Motor Diagnosis, Test, and Repair Process

          Excellent! Excellent! Excellent!

          Comment

          • Mike T.
            Very Frequent User
            • December 31, 1991
            • 568

            #6
            Re: C2 Headlight Motor Diagnosis, Test, and Repair Process

            Rich - Very nice work and a great job of showing us the process of building a PW motor. I do have one question for you, in the second pic, that end-play screw-shaft looks much longer than any PW motor I've seen in the past, was the end-play still good in the as-found condition? Maybe whoever worked on that motor before replaced the screw with a longer version for whatever reason?
            Mike T. - Prescott AZ.

            Comment

            • Ed S.
              Extremely Frequent Poster
              • August 6, 2014
              • 1377

              #7
              Re: C2 Headlight Motor Diagnosis, Test, and Repair Process

              That is a great thread on a C2 H/L motor repair - I can see it inspiring advanced novices to apply the remedies to their motors. One point that is critical to motor disassembly is to be aware of the brass bushing that the motor shaft rides on. It is held in place inside the motor by a disk spring that is tack welded into place - if the bushing is frozen on to the shaft and the motor is pulled from the motor housing the bushing will come with it - and it is impossible to get the bushing back in to where it is supposed to be without grinding the welded spring out - then you have to weld a new one in its place. If there are indications that the bushing is frozen on to the shaft there are ways to "encourage it" to free itself without pulling it out of the housing - soaking lubricants. It is apparent from your pictures that the bushing remained in the housing where it should be - that said, again... great post - and material for a Restorer article.
              Ed

              Comment

              • Richard M.
                Super Moderator
                • August 31, 1988
                • 11284

                #8
                Re: C2 Headlight Motor Diagnosis, Test, and Repair Process

                Originally posted by Mike Tarrant (20553)
                Rich - Very nice work and a great job of showing us the process of building a PW motor. I do have one question for you, in the second pic, that end-play screw-shaft looks much longer than any PW motor I've seen in the past, was the end-play still good in the as-found condition? Maybe whoever worked on that motor before replaced the screw with a longer version for whatever reason?
                Mike yes it is a bit longer than most I've seen. I edited the post(near the bottom) to add some photos and measurements for reference.

                Originally posted by Ed Szeliga (60294)
                That is a great thread on a C2 H/L motor repair - I can see it inspiring advanced novices to apply the remedies to their motors. One point that is critical to motor disassembly is to be aware of the brass bushing that the motor shaft rides on. It is held in place inside the motor by a disk spring that is tack welded into place - if the bushing is frozen on to the shaft and the motor is pulled from the motor housing the bushing will come with it - and it is impossible to get the bushing back in to where it is supposed to be without grinding the welded spring out - then you have to weld a new one in its place. If there are indications that the bushing is frozen on to the shaft there are ways to "encourage it" to free itself without pulling it out of the housing - soaking lubricants. It is apparent from your pictures that the bushing remained in the housing where it should be - that said, again... great post - and material for a Restorer article.

                Ed Yes these motors and much like heater blower motors etc. This motor is like brand new inside. it is dated 11 62. I was happy to see how nice the bushing and spring was when I pulled the armature. I was a bit worried about it but it slipped right out. I actually have parts in stock to repair them if needed. I use the Epoxy Method on any motor that has that issue.

                e.g. in this POST and this POST. (warning lots of photos so long load time) And this POST on C1 Heater Blower Motor.
                Rich
                Last edited by Richard M.; November 10, 2020, 06:25 PM.

                Comment

                • Ed S.
                  Extremely Frequent Poster
                  • August 6, 2014
                  • 1377

                  #9
                  Re: C2 Headlight Motor Diagnosis, Test, and Repair Process

                  Epoxy! Brilliant!! Much easier than tack welding - JB I presume.
                  Ed

                  Comment

                  • Richard M.
                    Super Moderator
                    • August 31, 1988
                    • 11284

                    #10
                    Re: C2 Headlight Motor Diagnosis, Test, and Repair Process

                    Originally posted by Ed Szeliga (60294)
                    Epoxy! Brilliant!! Much easier than tack welding - JB I presume.
                    YES.... the standard overnight cure type.

                    Rich

                    Comment

                    • Dan B.
                      Expired
                      • July 13, 2011
                      • 545

                      #11
                      Re: C2 Headlight Motor Diagnosis, Test, and Repair Process

                      Rich Very nice write ups and pics in all 3 headlight threads.

                      One question, when you are doing 2 motors from the same car, do you have any suggestions for synchronizing (timing) the motor speeds to get them to work close to each other (assuming all the mechanicals are otherwise equal).. I repaired one a while back that required removal of the welded end plate to fix a broken field winding on one side. It was suggested that the faster motor could be timed to the slower motor by reducing the end play on the faster motor thereby creating a bit of drag to slow it slightly. Any thoughts about this?

                      Comment

                      • Richard G.
                        Extremely Frequent Poster
                        • July 31, 1984
                        • 1715

                        #12
                        Re: C2 Headlight Motor Diagnosis, Test, and Repair Process

                        I wouldn't recommend it (thrust loading the motor to slow it down). They are not designed for the thrust loading and it could change over time.
                        If properly repaired, and both motors are rebuilt together, they should be close enough to pass a PV.
                        On the bench, I timed both of mine without a load. I had one significantly slower than the other.
                        After pulling my hair out I found where the worm was off center from the gear.
                        I had to us magnification to see it. I have a lathe so I was able to make a small shim to recenter the gear.
                        That was the fix it needed to rotate together.

                        Note; The center of gravity of the headlights is very close to the shaft centerline. So the timing changed little from the bench testing to installation.
                        Now my headlights rotate within a second of each other.

                        While on this subject, I cleaned the aluminum housing with a HF soda blaster. The housing looked like they were just popped from the mold when I was done. Really looked nice.
                        Rick

                        Comment

                        • Richard M.
                          Super Moderator
                          • August 31, 1988
                          • 11284

                          #13
                          Re: C2 Headlight Motor Diagnosis, Test, and Repair Process

                          Originally posted by Dan Bachrach (53579)
                          Rich Very nice write ups and pics in all 3 headlight threads.

                          One question, when you are doing 2 motors from the same car, do you have any suggestions for synchronizing (timing) the motor speeds to get them to work close to each other (assuming all the mechanicals are otherwise equal).. I repaired one a while back that required removal of the welded end plate to fix a broken field winding on one side. It was suggested that the faster motor could be timed to the slower motor by reducing the end play on the faster motor thereby creating a bit of drag to slow it slightly. Any thoughts about this?
                          Dan I don't believe there ever was a spec form Chevrolet regarding synchronization of motors.

                          I experimented a few years ago. I had several armatures and swapped them out to see if I could get 2 motor synchronized. I spent hours. Then I figured out that I was being too anal and wasting my time so I gave up the attempt.

                          I do not recommend adding drag with a tighter endplay screw. It wasn't designed for that. It would also add stress to the motor, too much heat on the plastic screw button(if present), and actually draw more current and run hotter.

                          If anything, it may be feasible to add some shim washers inside the gearbox main cast gear to cause the drag there, jut like the drag caused when running the motors right after a 8" heavy wet snowstorm in the 60's in Upstate New York without brushing it off first. (I bet that really happened)

                          Rich

                          PS I added a few more diagnosis video links to the original post.

                          Comment

                          • Richard M.
                            Super Moderator
                            • August 31, 1988
                            • 11284

                            #14
                            Re: C2 Headlight Motor Diagnosis, Test, and Repair Process

                            Earlier today I found my collection of Main Gears and took some measurements to try and understand the Main Gear washer placement information.

                            Here is the configuration as specified in GM documentation.
                            1110200517_Burst01_resized.jpg

                            Note the steel washer(4238083) is above the conical washer(4238082)
                            1110200518_resized.jpg

                            In most motors I've rebuilt over the last 10 years, if the washers are in this configuration the motor will drag and sometimes stop. There were problems with gears being too thick. I have shaved repro gears to get them to rotate free.

                            Here is a sample of some original and repro gears and their thickness measurements. They vary quite a bit. The 3rd from the top is a older repro. It is the thickest of them all.... 0.998"
                            1110201127_resized.jpg

                            This thickness is critical and the gear to housing/cover drag can occur if it's too thick. This part is a recently purchased new reproduction, but I need to confirm. It measures the lowest thickness of all of my samples.... 0.984"
                            1110201128c_resized.jpg

                            These are thickness measurements for the washers mentioned above. I measured several that I have and they're consistent.
                            1110201130_resized.jpg

                            Here are some case and housing measurements for reference. Sorry for the hen-scratching.
                            1110201151_resized.jpg

                            1110201151a_resized.jpg

                            edit.... the measurement, 0.0344") is wrong I'll fix it later. might be 0.344"
                            1110201151b_resized.jpg

                            I need to do some calculations to come up with a maximum gear thickness allowance and to understand why some motors cannot run properly when the washers are configured as original documentation shows.

                            Rich
                            Last edited by Richard M.; November 11, 2020, 04:46 AM.

                            Comment

                            • Dan B.
                              Expired
                              • July 13, 2011
                              • 545

                              #15
                              Re: C2 Headlight Motor Diagnosis, Test, and Repair Process

                              I too have had to mill down some thicker replacement gears to match originals. Overall, the speed differential on all the motors I've worked on translates probably to no more than a second difference, and that does not bother me. As you mentioned, there may likely be differences between the field windings that effect motor speed. I liked your idea of fabricating that replacement felt washer, very cleaver.

                              Comment

                              Working...
                              Searching...Please wait.
                              An unexpected error was returned: 'Your submission could not be processed because you have logged in since the previous page was loaded.

                              Please push the back button and reload the previous window.'
                              An unexpected error was returned: 'Your submission could not be processed because the token has expired.

                              Please push the back button and reload the previous window.'
                              An internal error has occurred and the module cannot be displayed.
                              There are no results that meet this criteria.
                              Search Result for "|||"