
I have a oil gauge and a service manual on the way, what is the best and probably the only way to replace the oil gauge, 1969 427 4 speed thanks.
-
-
Re: 1969 oil gauge replacement
Hi Keith,
It's not a pleasant job and you do need to be very careful handling the gauge bezel itself because it's QUITE fragile and easy to break into 2 pieces (top third, and bottom two-thirds.)
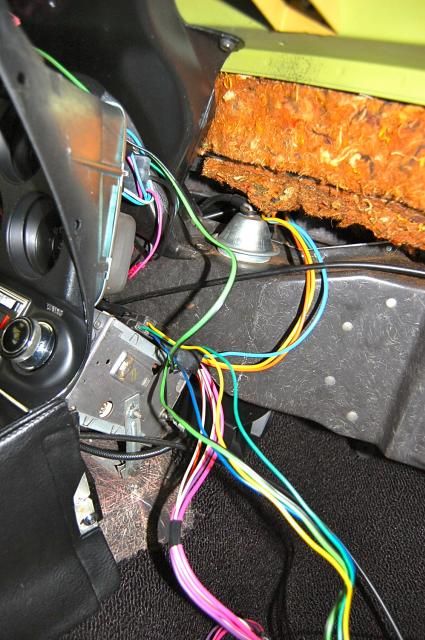
The screws that hold it in place (2 each side, into the lower dash pads, and 3 at the top that secure the wiper switch bezel in place) are pretty obvious. But, what's not so obvious is that there are 2 threaded studs along the bezel's lower edge that secure the bezel to the upper forward edge of the shifter console. These studs are hidden and the nuts on them can be difficult to access.
The radio needs to be loosened from the bezel if you're going to move the bezel more than a couple of inches.
The Chassis Service Manual suggests removing the passenger's side lower dash pad to gain access to the gauges and bezel from that side too.
In the 71 CSM the info on removing the gauge cluster is in Section 12 Electrical Body and Chassis, Page 12-31, with an illustration fig.18.
REMEMBER be VERY gentle when working on the bezel itself!
Good Luck!
Regards,
Alan
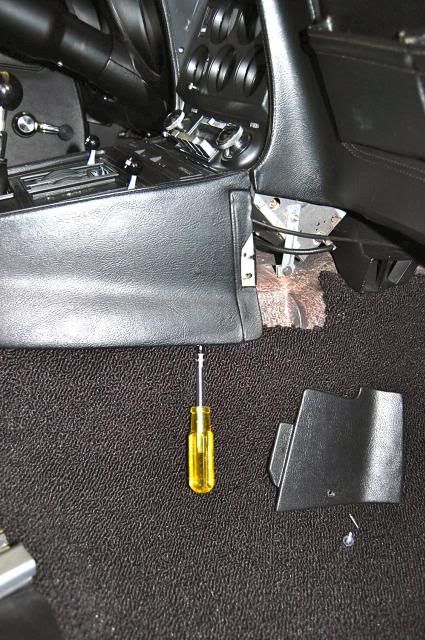
This is the kind of access you have when you remove the right side lower dash pad. The gauge bezel is still in place.
Here's one method to reach the nuts on the studs. (a 1/4" drive socket and 2 long extensions).
 71 Coupe, 350/270, 4 speed
Mason Dixon Chapter
Chapter Top Flight October 2011 -
Re: 1969 oil gauge replacement
A copy of the AIM (Assembly Instruction Manual) would also be an asset. The drawings in there will give you a good idea of where those pesky studs and nuts are.
A hint: My 1970 has slots in the lower console where the studs and nuts go. The nuts do not have to be entirely removed from the studs. Having the nuts remain on the ends of the studs will be a decided advantage in re-assembly. I can not tell you if 1969 had the slots, but I wouldn't be surprised they do.TerryComment
-
Re: 1969 oil gauge replacement
I would definately recommend removing the passenger side lower dash, makes access much better. BTW, the repro gauge from AC Delco is pretty darned good, the needle is slightly different but if you swapped needles I believe it would be essentially undetectable as a repro.Comment
-
Re: 1969 oil gauge replacement
Thanks Joe. Good to know.
I had mine out twice before I discovered the slots and that it was un-necessary to completely remove those nuts. Removing the bezel ranks right up there with removing the power brake booster. Not quite as bad as the booster, but close.TerryComment
-
Re: 1969 oil gauge replacement
Terry------
It's still hard to get in there and loosen or tighten the nuts. GM says to "insert a flexible drive socket" as if it were just that simple.
My solution? Install wing nuts instead of the hex nuts. Then, as long as your hand is small enough, just reach in and loosen or tighten them. Finger tight is plenty for these nuts which don't have a very high specified torque, anyway.In Appreciation of John HinckleyComment


Comment